TechPowerUp GPU-Z is a graphics card information free software that provides detailed information about the graphics card installed in a computer system. This software is particularly useful for computer enthusiasts, gamers, and system administrators, who want to keep track of the graphics card’s performance, temperature, and specifications.
Table of Contents
GPU-Z is available to download for free of charge. The software is compatible with Windows operating systems and is an easy-to-use tool for anyone looking to get a better understanding of your graphics card.
TechPowerUp GPU-Z
GPU-Z is a highly regarded system information utility designed specifically for graphics cards. It provides in-depth information about the graphics card hardware, including the name, manufacturer, clock speeds, temperature, and much more.
The software is also capable of monitoring the GPU’s performance, including the memory and core clock speeds, in real-time, making it an ideal tool for monitoring the health and performance of a GPU. Additionally, GPU-Z provides support for a wide range of graphics cards and platforms, including both AMD and NVIDIA GPUs. Overall, GPU-Z is considered to be a reliable, efficient, and comprehensive tool for monitoring and diagnosing graphics card issues.
You may also like: MSI Afterburner – Optimize Graphics Card
How to Install GPU-Z on Windows?
To install GPU-Z, you need to follow these steps:
- Download GPU-Z from the download section of this website.
- Open setup once the download is complete,
- Double-click the installation file to start the installation process.
- Follow the on-screen instructions to complete the installation process.
- Launch GPU-Z from the start menu or desktop shortcut.
With these simple steps, you can successfully install GPU-Z on your Windows system and use it to monitor and optimize your GPU performance.

How to Use TechPowerUp GPU-Z
TechPowerUp GPU-Z is a powerful and invaluable tool for PC enthusiasts, gamers, and professionals who want to delve deep into the details of their graphics card. Whether you’re overclocking, troubleshooting, or just curious about your GPU’s performance, GPU-Z provides a wealth of information. In this comprehensive guide, we’ll walk you through the steps on how to use TechPowerUp GPU-Z effectively.
Step 1: Launch GPU-Z
After installation, you can launch GPU-Z. It usually creates a desktop shortcut, or you can find it in the Start menu or by searching for “GPU-Z” in the Windows search bar.
Step 2: Explore the GPU-Z Interface
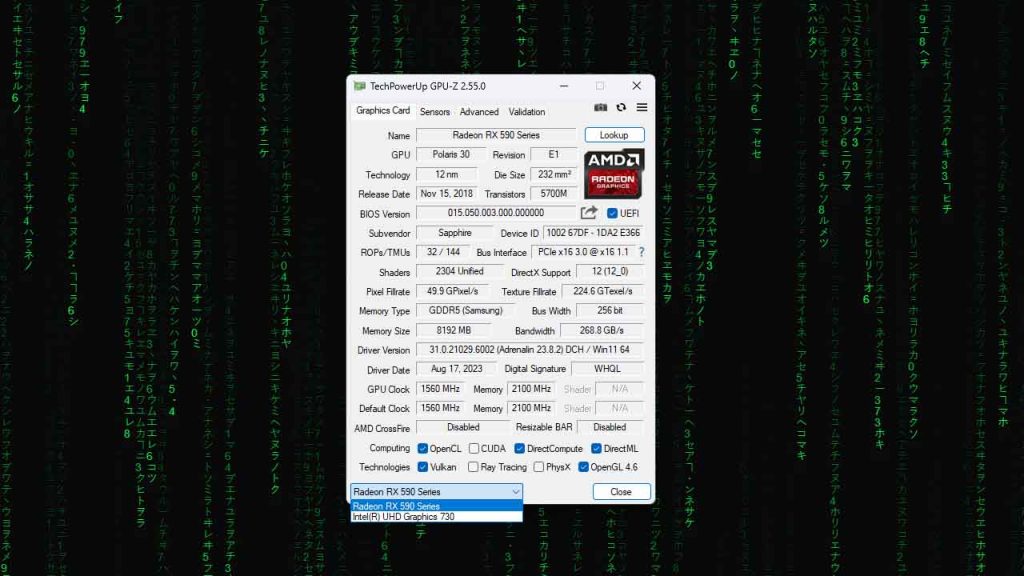
The GPU-Z interface is user-friendly and provides a wealth of information about your graphics card. Let’s explore its key components:
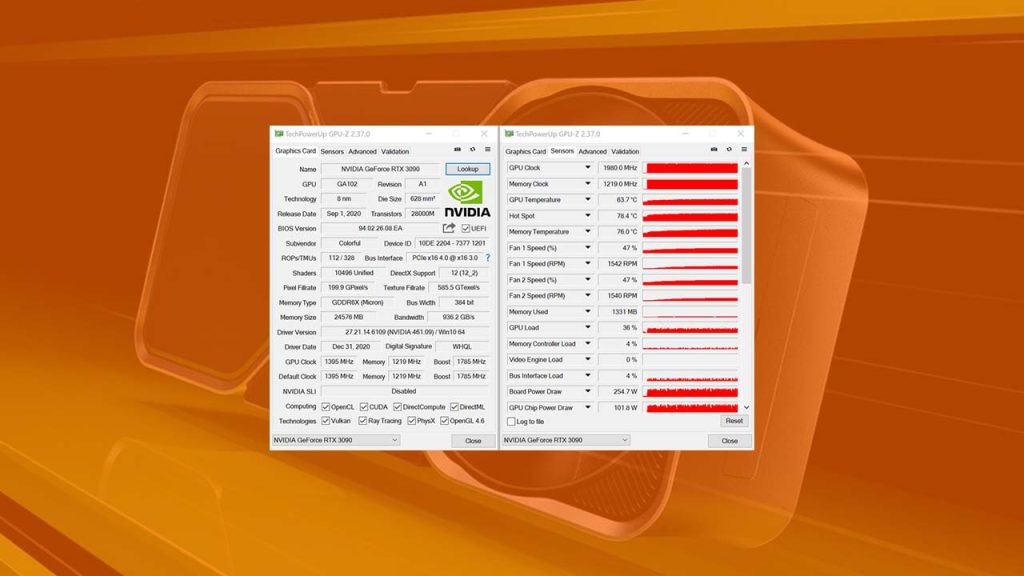
- Main Tab: The main tab displays essential information about your GPU, such as the name, GPU and memory clock speeds, driver version, and BIOS version.
- Sensors Tab: This tab offers real-time monitoring of your GPU’s temperature, fan speed, load, and more. It’s invaluable for checking temperatures during gaming or stress testing.
- Graphics Card Tab: Here, you’ll find detailed specifications of your GPU, including its architecture, DirectX version support, and the number of shader units.
- Advanced Tab: The advanced tab provides even more detailed information, such as GPU and memory support, CUDA cores, and OpenCL support.
Step 3: Monitor GPU Performance
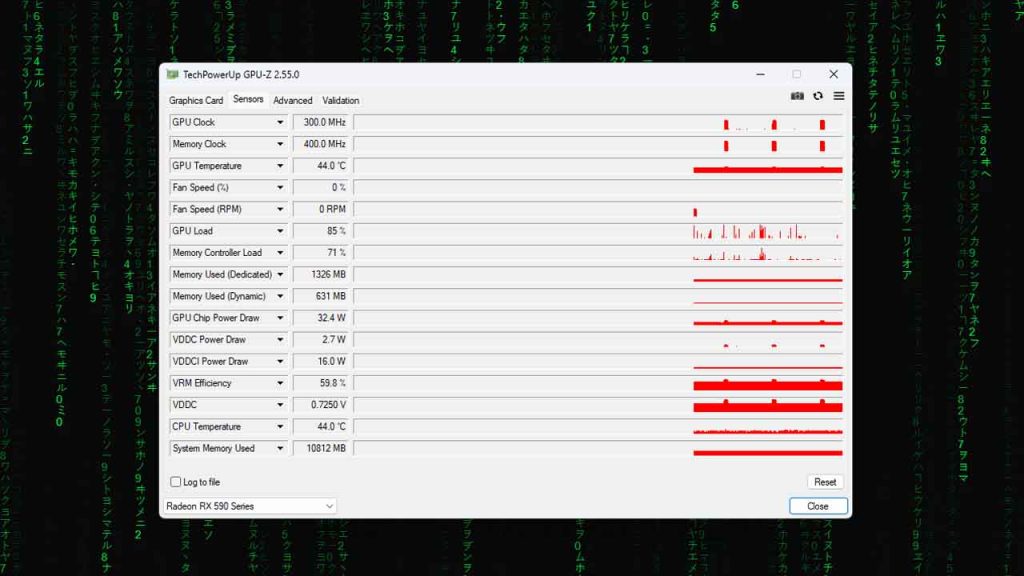

Here is detailed information on the usage of this tool effectively to monitor your graphics card performance using GPU-Z:
3.1 Real-Time Monitoring
The Sensors tab is where you can monitor your GPU’s performance in real time. It displays data like temperature, fan speed, clock speeds, usage percentages, and more. This information is crucial for understanding how your GPU behaves under different workloads.
3.2 Logging Data
GPU-Z allows you to log sensor data to a file. To enable logging, click on the “Log to file” button at the bottom of the Sensors tab. This is handy for tracking temperature and usage over extended gaming sessions or benchmark runs.
Step 4: Save GPU-Z Data
You can save the information displayed in GPU-Z by clicking the “Save Report” button at the bottom right of the main window. This creates a text file containing all the details about your GPU. This file can be useful for reference or sharing with others if you need technical support.
Step 5: Update GPU Drivers
GPU-Z also provides a convenient link to check for driver updates. Simply click on the “Check for Updates” button in the main tab, and it will take you to the GPU manufacturer’s website where you can download the latest drivers.
Step 6: Advanced Features
GPU-Z also offers some advanced features like GPU BIOS backup and GPU validation. These features are more technical and require careful consideration before use. If you’re not experienced with these functions, it’s best to consult with online resources or forums for guidance.
You may also like: EVGA Precision X 16 – GPU Tuning for DirectX 12
Conclusion
TechPowerUp GPU-Z is an essential tool for anyone looking to gain insights into their graphics card’s performance and specifications. By following the steps outlined in this guide, you can download, install, and effectively use GPU-Z to monitor your GPU, troubleshoot issues, and make informed decisions about optimizing your graphics card’s performance. Whether you’re a gamer, enthusiast, or professional, GPU-Z is your gateway to mastering your graphics card and enhancing your computing experience.
Download Section
If you are unable to download GPU-Z from the above button, use mirror download.
FAQ’s
TechPowerUp GPU-Z is a popular and trusted utility for monitoring and gathering information about your graphics card. Here are some frequently asked questions about GPU-Z:
What is GPU-Z, and why do I need it?
GPU-Z is a lightweight tool that provides detailed information about your graphics card’s specifications, performance, and status. It’s useful for gamers, overclockers, and PC enthusiasts who want to monitor their GPU’s temperature, clock speeds, VRAM usage, and more.
Is GPU-Z free to download and use?
Yes, GPU-Z is entirely free to download and use. You can get the latest version of GPU-Z for the best deatils possible.
How do I download GPU-Z?
To download GPU-Z, visit the official TechPowerUp website or go to the download section of this article and click on the “Download Now” button.
Is GPU-Z safe to download and install?
Yes, GPU-Z is a trusted utility developed by TechPowerUp, and it’s widely used in the PC gaming community.
What information does GPU-Z provide about my graphics card?
GPU-Z provides a wealth of information, including the graphics card’s name, GPU architecture, clock speeds, temperature, fan speed, memory type and size, DirectX version, driver version, and more.
Can I use GPU-Z to overclock my graphics card?
While GPU-Z provides information about your GPU, it doesn’t offer overclocking functionality itself. However, it can be used in conjunction with overclocking utilities like MSI Afterburner or EVGA Precision X to monitor the effects of your overclocking settings.
Does GPU-Z support all graphics cards?
GPU-Z supports a wide range of graphics cards from different manufacturers, including NVIDIA, AMD, and Intel. It is continually updated to include support for new GPU models as they are released.
How do I update GPU-Z to the latest version?
To update GPU-Z, simply download the latest version from the official website and install it over your existing installation. Your settings and preferences should be retained.
Can I use GPU-Z to troubleshoot graphics card issues?
Yes, GPU-Z can be a valuable tool for diagnosing graphics card-related problems. You can use it to monitor temperatures, clock speeds, and other parameters while running demanding applications or games to identify issues like overheating or GPU throttling.
Is there a GPU-Z user manual or guide available?
Yes, on this page, you can find a user manual that provides detailed information on how to use the tool effectively. It’s a helpful resource for understanding the various features and options available in GPU-Z.
If you have a question, feel free to ask in the comments.

